A Beginner’s Guide to New Lawn Installation
Imagine stepping onto a soft, dense, perfectly green lawn just a few weeks from now. A beautiful lawn can completely transform your outdoor space, turning it into a vibrant area for family, pets, and quiet afternoons. If you’re tired of a patchy, weed-filled yard and don’t want to wait months for grass seed to mature, then a pre-grown lawn is your answer.
This method uses what’s known as “turf” or “sod”a ready-made carpet of real grass and soil that arrives in rolls. Its greatest advantage is speed. While nurturing a lawn from seed can take an entire season, a turf lawn looks complete the day it’s laid. It provides an “instant” green canvas that becomes a durable, usable lawn in just two to three weeks as the new roots take hold.
The process boils down to three core phases: preparing the ground, laying the turf rolls, and providing the right amount of water. This guide covers each part of the project, giving you the knowledge to get it right the first time.
Turf vs. Seed: Making the Right Choice for Your Time, Budget, and Garden
When creating a new lawn, you have two main paths: laying ready-made turf or sowing grass seed from scratch. While both can lead to a beautiful result, the journey is very different. The right choice depends on your priorities, particularly how you balance immediate results against your budget.
The turf vs. seed debate comes down to three factors:
- Cost: Turf has a significantly higher upfront cost because you are paying for professionally grown, mature grass. Grass seed is very inexpensive to purchase.
- Speed: This is turf’s biggest advantage. You get an “instant” green lawn the day you finish laying it, and it’s typically ready for light use in 2-3 weeks. A seeded lawn needs months of careful nurturing to grow in and a full year or more to become truly dense.
- Initial Weeds: Because turf is a thick, established mat, it immediately chokes out most underlying weeds. A newly seeded area, however, is bare soil—the perfect invitation for opportunistic weeds to sprout and compete with new grass seedlings.
Ultimately, installing turf is like paying a premium for speed and convenience. Sowing seed is the budget-friendly route that demands more patience and a longer-term commitment to weeding and care. Whichever path you lean towards, success begins with picking the right time of year to start.
The Gardener’s Calendar: Pinpointing the Best Season to Lay Your New Lawn
Just like planting a tree, timing is everything for a new lawn. For the highest chance of success, the best time to lay turf is in the autumn. The soil is still warm from the summer months, which encourages new grass roots to grow deep and strong. At the same time, the cooler air and reliable rainfall reduce stress on the visible grass blades. This combination allows the turf to establish itself properly before winter, giving you a robust lawn come spring.
If you can’t wait for autumn, spring is your next-best window. The mild temperatures give the new turf a healthy start, allowing it to begin knitting into the soil. However, your new lawn will have less time to develop a deep root system before the heat stress of summer arrives. This means you must be prepared for a more intensive watering schedule to help it survive its first hot season.
Laying a new lawn in the peak of summer is a high-risk gamble. The intense sun and heat put immense pressure on new turf, making it incredibly difficult for the roots to take hold. You’ll fight an uphill battle against drying out, which often requires multiple waterings per day. By planning your project for the milder seasons, you work with nature, not against it.
Measure Twice, Lay Once: How to Calculate Your Lawn Area and Avoid Costly Mistakes
Nothing stops a weekend landscaping project faster than running out of materials. When it comes to a new lawn, coming up short on turf is a costly headache, as new rolls ordered later might not match in color or texture. Accurate measurement is one of the most crucial preparation steps.
Figuring out your total area is simpler than you might think. Grab a tape measure and a notepad, then follow this three-step process:
- Measure the Main Sections: For any square or rectangular parts of your yard, measure the length and the width in metres. Multiply those two numbers to get the area in square metres (m²).
- Break Down Odd Shapes: If your lawn has curves or irregular edges, imagine it as a collection of smaller, rough squares. Measure these approximate squares and add their areas to your main total. Don’t worry about perfect precision; the next step will account for it.
- Add It All Together: Sum up the areas of all your sections to get your grand total.
This brings us to the single most important rule of ordering turf: always order 5-10% extra. Think of this as project insurance. You’ll need this “waste factor” to account for cuts along paths, garden beds, and curved edges. It also provides a buffer for miscuts or a damaged roll. To calculate your final number, multiply your total area by 1.10 (for 10% extra). For example, a 50 square metre lawn needs an order of 55 square metres (50 x 1.10 = 55).
With your final number in hand, you know exactly how much turf you need. The next step is deciding on the best type of grass to turn your vision of a lush, green yard into a reality.
Not All Grass is Green: Choosing the Right Turf for Sun, Shade, and Foot Traffic
With measurements ready, you might think ordering turf is as simple as picking up the phone. However, the type of turf you choose will have a huge impact on how your lawn looks and performs. The key is to match the grass to your lifestyle and your garden’s specific conditions. Do you need a robust playground for kids and pets, or are you dreaming of a perfect, manicured green carpet?
For most households, the answer is a durable, multi-purpose lawn, often sold as hard-wearing turf. It’s cultivated with tougher grass species that can withstand the daily wear and tear of family life. If you’re looking for the best grass for a family garden or a lawn that can handle energetic pets and children, this is your go-to choice. It’s the resilient option for everything from garden parties to a game of catch.
Beyond durability, the biggest factor is sunlight. Assess your garden: does it bake in the sun all day, or are parts cast in shadow by trees, fences, or your house? Many turf suppliers offer special shade-tolerant blends for less sunny spots. In contrast, ornamental turf creates that pristine, bowling-green look but is far less forgiving. It often requires more maintenance and won’t stand up to heavy use or shady conditions.
You don’t need to be a grass expert to get this right. When you call a supplier, simply describe your needs. Tell them your total area, how much sun your garden gets, and that you need a lawn for family use. If the decision feels overwhelming, professional landscaping services can provide expert advice and installation. Once you’ve selected the right turf, you’re ready to tackle the physical work of ground preparation.
The Most Important Step: A Guide to Clearing and Preparing the Ground
It’s tempting to lay new turf rolls over your old, patchy grass like a green blanket. This is the single biggest and most common of all DIY turfing mistakes. The old grass and weeds underneath won’t magically disappear; they will die, rot, and create a slimy layer that prevents your new turf’s roots from reaching the soil. For a successful installation, you absolutely must start with a clean slate by removing every last bit of the old lawn, weeds, and moss.
For smaller areas, a sharp spade is all you need. The goal is to slice under the grass and lift it off, taking about an inch or two of soil with it. Think of it like skinning an orange—you want to peel the surface layer away neatly. This is hard work, but you’re not just removing old grass; you’re also getting rid of a generation of weed seeds.
If you’re looking at a larger area, save your back and rent a turf cutter from a local tool hire shop. This walk-behind machine uses a powerful blade to slice under the lawn and peel it away in manageable strips. What might take an entire weekend with a spade can often be done in just a few hours. It makes the job faster, easier, and gives you a cleaner surface to work with.
Once all the old turf is removed, you’ll be left with bare earth. The soil is likely hard and compacted from years of foot traffic and rain, a poor foundation for new roots. Before laying your new turf, you need to turn this hard ground into a soft, nutrient-rich bed where your lawn can thrive.
The Secret Ingredient: How to Create a Nutrient-Rich Bed for Your New Lawn
With the old lawn gone, you’re staring at a blank canvas of bare earth. The ground underneath is likely as hard as a rock, and delicate new grass roots can’t push through compacted soil to find water and nutrients. Giving them a soft, welcoming bed is the most important part of preparing the ground.
First, break up this solid ground. Using a sturdy garden fork or a rented rototiller, turn the soil over to a depth of about four to six inches. The goal isn’t to create fine powder, but to break up the dense clumps into a looser, crumbly texture. This step creates vital air pockets and pathways for roots to travel downward, which is essential for establishing a strong, drought-resistant lawn.
Next, add a quality compost. Spread an even layer, about two inches deep, across the entire area. A pre-made topsoil and compost mix for grass from a garden center also works perfectly. This organic matter does two critical jobs. First, it’s packed with nutrients. Second, it improves soil structure—helping heavy clay drain better and sandy soil hold onto more water.
Use a wide landscape rake to mix the compost into the top few inches of the loosened soil. As you work, focus on creating a smooth, level surface. This is your chance to do some minor landscaping by pulling soil away from high spots and filling in dips. Make sure the soil gently slopes away from your house foundation to prevent water from pooling.
Finally, the ground needs to be firm. A surface that’s too fluffy will settle unevenly, creating a lumpy lawn. The classic method is the “gardener’s shuffle”—walking all over the area with your heels to lightly compact it. Rake it smooth one last time. When you’re finished, the soil should be firm enough that you only leave a slight footprint. With this perfect foundation prepared, you are finally ready to lay the turf.
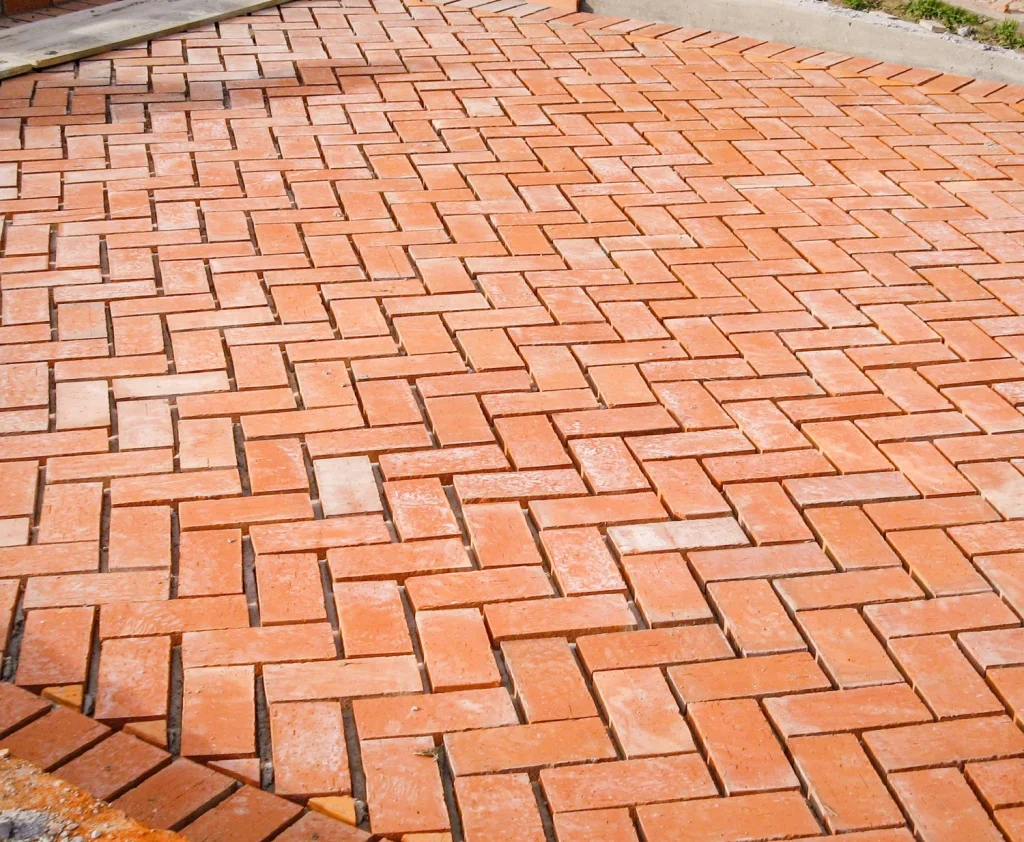
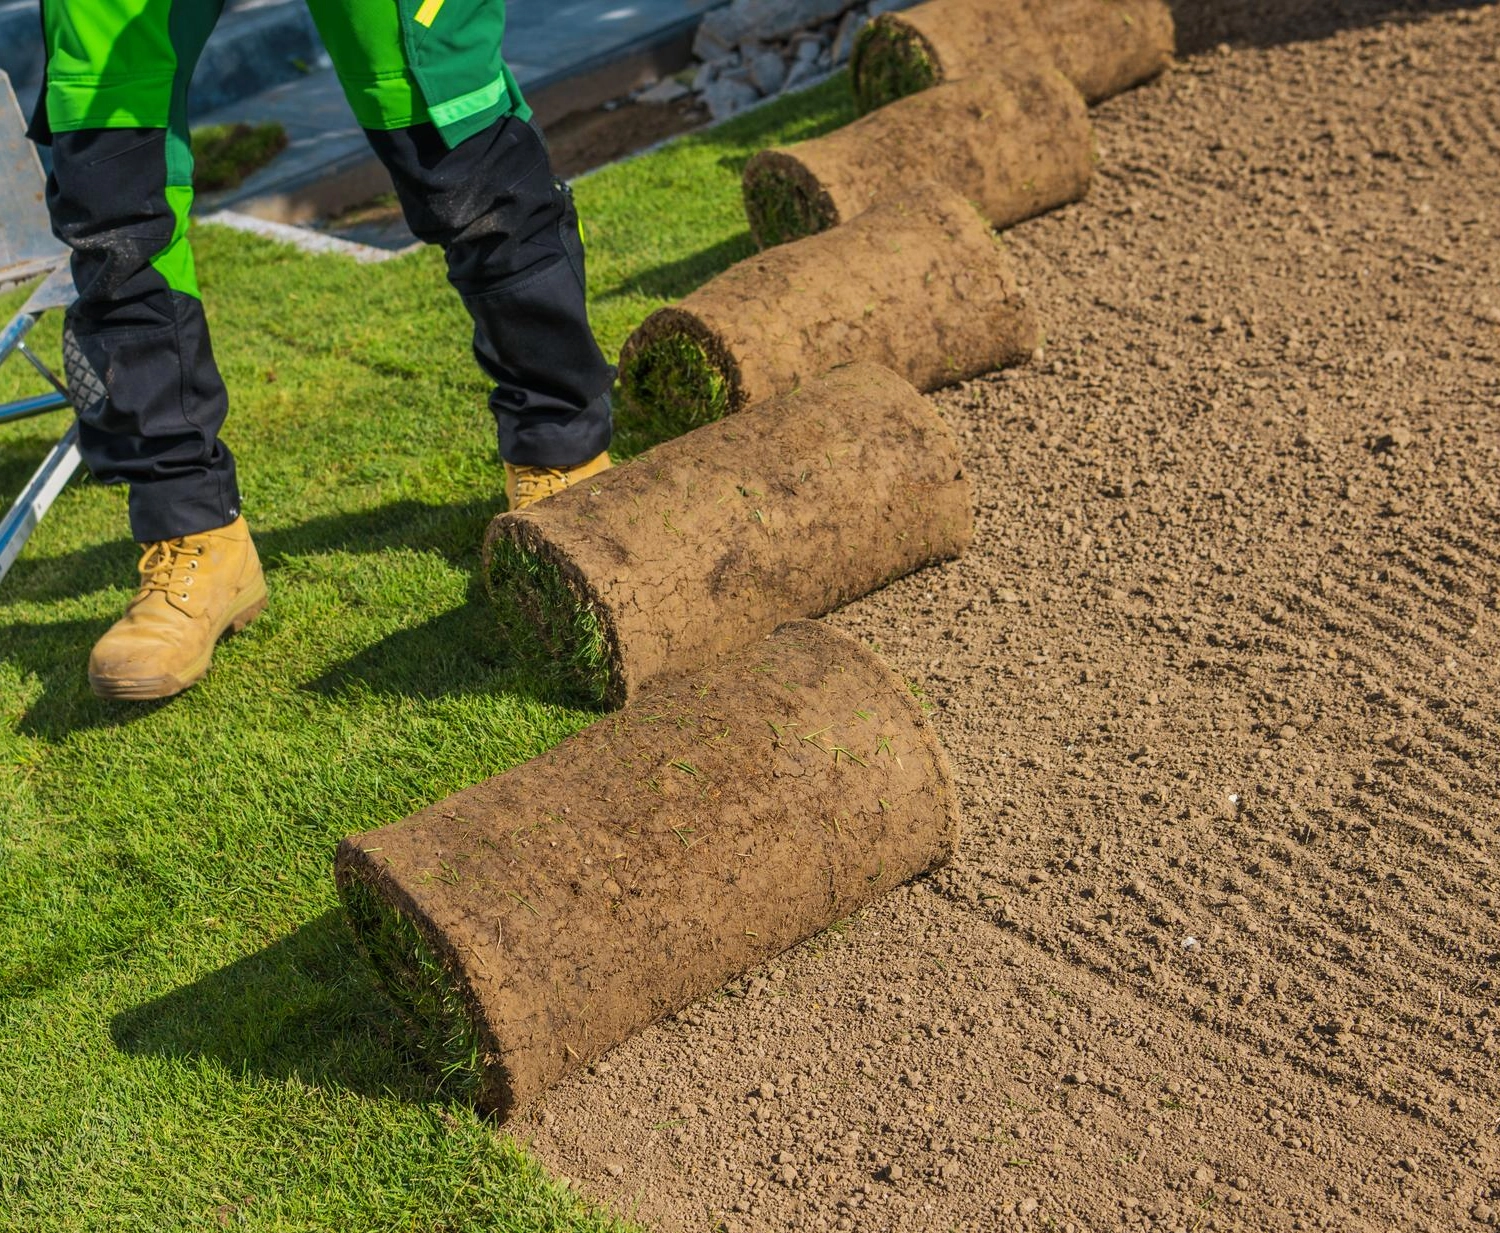
How to Lay Turf Like a Pro: A Step-by-Step Guide for a Flawless, Green Carpet
With your soil perfectly prepared, the most satisfying part of your project begins: rolling out the green carpet. This stage is all about technique. Getting it right ensures your lawn will look like a seamless, professional job, not a patchwork of squares. Handle the turf rolls carefully and lay them in a specific pattern to create a strong, unified surface.
Think of laying turf like laying bricks; you never want the short ends to line up. This “staggered” pattern is the single best trick for hiding seams and making your lawn stronger. When the short seams are all in a row, they can dry out and pull apart, creating visible gaps. Staggering them ensures every piece of turf is supported on all sides by its neighbors.

Follow this step-by-step guide for a perfect finish:
- Start Straight: Begin by laying your first row of turf along a long, straight edge, like your driveway, a path, or a fence line. This gives you a solid reference point.
- Stagger the Next Row: To create the brick pattern, cut the first piece of your second row in half with a sharp utility knife. Start the row with this half-piece, and all the seams will automatically be staggered.
- Butt the Edges: As you lay each new piece, push its edge firmly against the one next to it. The goal is a tight fit with no gaps, but don’t overlap them. Overlapped turf will create bumps, and the grass underneath will die. If you see small gaps, you can brush some topsoil into them later.
- Work Smart: To avoid leaving deep footprints in the soft ground, lay a plank or a wide piece of plywood down on the turf you’ve just installed. Kneel on the board to lay the next pieces.
Once the last piece is in place, your new lawn is laid, but it’s incredibly vulnerable. The roots are just sitting on top of the soil and need water immediately.
Don’t Let It Dry Out: The Exact Watering Schedule for Your New Turf
That first watering is the single most important step in ensuring your new lawn survives. The moment you finish laying the turf, its roots can begin to dry out in under an hour on a hot day. Your immediate goal is a deep, thorough soaking. This isn’t a light sprinkle; you want to apply enough water to soak completely through the turf and saturate the top 4 to 6 inches of soil beneath it. This initial drenching tells the new roots where to go: down into their new home.
To know if you’ve watered enough, use the “corner lift” test. Gently lift a corner of one of the turf rolls and peek underneath. The bottom of the turf should be dripping, and the soil below should be dark and soggy. If the soil is still dry and crumbly, keep watering. This check is the most reliable way to confirm the roots are getting the water they need.
For the first one to two weeks, your job is simple: keep the lawn consistently damp. Depending on the weather, this might mean watering once a day in the morning, or even twice on very hot or windy days. Never let the turf dry out completely. Yellowing edges or widening seams between turf rolls are common signs of new turf not taking, and they almost always point to a lack of water.
As you enter the third week, the roots should be starting to anchor. If you try the corner lift test now, you should feel some resistance. This means you can begin to adjust your watering schedule. Start watering less frequently—perhaps every other day—but for a longer duration each time. This change encourages the roots to grow even deeper in search of water, making your lawn stronger and more drought-resistant. Before you know it, your lawn will be strong enough for its very first mow.
Signs of Life: Your New Lawn’s First Mow and Other Milestones
After a couple of weeks of diligent watering, you can check for the most important sign of progress: root establishment. Use the “Tug Test.” Gently take hold of a corner of a turf roll and give it a light pull. If you feel solid resistance, congratulations! The roots have woven themselves into the soil. If the corner lifts up easily, it’s not quite ready. Give it another week of your current watering routine before testing again.
Once your lawn passes the Tug Test, it’s time for its first mow. The golden rule is to mow high and mow dry. Wait for the grass to be completely dry, then set your mower blades to their highest possible setting. Your goal is only to trim the very top of the blades, never removing more than one-third of the grass’s total height. Mowing too low can shock the young grass and pull up the roots.
With that first mow complete, your lawn is finally starting to feel like a proper yard. While it’s now safe for light foot traffic, hold off on any heavy use for the first three to four weeks. The ground is still settling, and the root system is maturing. Giving it this extra time allows the roots to fully establish a strong, dense network.
This new phase of lawn care shifts from intensive care to regular maintenance. Don’t panic if your lawn doesn’t look perfect just yet. Small gaps or slight color variations are not necessarily major signs of failure; most of these minor imperfections are common and can be easily corrected.
Troubleshooting Your New Lawn: How to Fix Gaps, Yellow Patches, and Bumps
Even with the best care, your new lawn might show a few quirks as it settles in. Seeing small imperfections is normal and rarely a sign of failure. Most common issues are cosmetic and can be fixed with targeted attention.
Here are simple solutions to the most frequent new-lawn hiccups:
- Seeing Gaps Between Turf Rolls? This is the easiest fix. Create a simple mix of 50% topsoil and 50% sand. Lightly pack this mixture into the gaps to bring them level with the turf. This gives the grass a bridge to grow across. Keep the filled areas moist.
- Noticing Yellow or Brown Patches? This is almost always a watering issue. Some spots, especially along concrete edges or in full sun, dry out faster. Give these discolored areas extra hand-watering every day until their green color returns.
- Feeling Bumps or Air Pockets? If your lawn feels squishy or uneven in spots, the turf roots aren’t making good contact with the soil. A lawn roller, which you can rent, is the best tool for this.
When using a lawn roller on fresh turf, lighter is better. Wait until the lawn has passed the “tug test” and is no longer soggy. Fill the roller only one-third to one-half full with water—you want to gently press the turf down, not flatten it. Roll over the bumpy areas once to press out the air pockets and ensure the roots can reach the soil.
These small adjustments are a normal part of the process. By catching them early, you are guiding your lawn toward becoming the mature, resilient, and beautiful outdoor carpet you envisioned.
DIY vs. Hiring a Pro: A Realistic Look at Cost and Effort
Deciding between installing the lawn yourself and hiring a professional often comes down to a simple trade-off: your budget versus your back. Going the DIY route means you only pay for materials like turf and topsoil. In contrast, the average cost to lay turf from a professional service can be two or three times higher, as their price includes labor, equipment, and expertise. This upfront investment buys you a guaranteed result without a weekend of heavy lifting.
Before committing to doing it yourself, honestly assess the work involved. The process involves clearing out all old grass, breaking up compacted soil with a rented tiller, and hauling dozens of turf rolls that can each weigh over 15kg (35 lbs). Underestimating the sheer physical effort is one of the most common DIY turfing mistakes.
If that sounds like more than you bargained for, professional landscaping services offer a valuable shortcut. A good crew brings experience, knowing how to grade the soil correctly to prevent drainage issues and having the right equipment to get the job done efficiently. When you request quotes, ask critical questions: “Does your price include full soil preparation?” and “Do you offer a warranty on the turf installation?” A reputable company will be happy to explain their process and stand by their work.
Ultimately, the right choice is a personal one that rests on your budget, physical ability, and available time. There’s a huge sense of satisfaction in completing the project yourself, but there’s also wisdom in knowing when to call in an expert. No matter which path you take, a clear plan is your key to success.
Your New Lawn Action Plan: From Green Carpet to Thriving Garden
You now have a clear path to the lush, green lawn you’ve envisioned. This blueprint for a successful new lawn installation explains the crucial “why” behind each step of the process.
The success of your project hinges on three critical factors: a perfectly prepared foundation, laying the turf in a tight, staggered pattern, and providing consistent, deep water for the first few weeks. Mastering these turns a complex landscaping task into a manageable process. As your lawn takes root, your focus will simply shift to long-term care, like mowing and fertilizing.
You have a complete framework for laying turf and keeping it healthy for years to come. That bare patch of dirt is no longer an obstacle—it’s an opportunity. Your beautiful new lawn is waiting for you to begin.